- Concrete footings 101
- Bearing capacity of soil
Understanding soil type and bearing capacities - Footing size
How to determine the minimum size for soil conditions - Footing problems
Pouring in wet soil and more - Frost heave & foundation footings
- Frost protected shallow footings
- Related Information:
- Concrete calculator for footing pours:
Figure out how many cubic yards you'll need - Foundation drains for concrete footings
Pouring Footings in Wet Soil & Other Common Problems
What to do when the footing is below the water table, how to fix misplaced footings and moreFooting Below Water Table
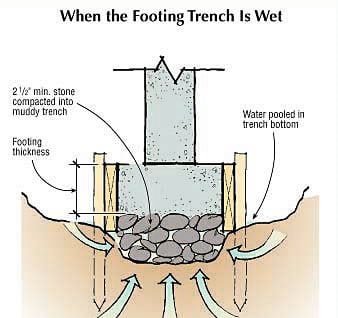
When water is pooled in the trench, the author recommends placing large cobbles in the form bottom and compacting them down into the mud. Muck and water may fill the spaces between stones, but contact between the stones will provide bearing. Be sure to use a stiff concrete mix when you cast the footings.
When you're working in an area with a perched water table during the wet season, you sometimes find groundwater moving into your trench. If the flow is slow enough so you can pump the water out without it flowing right back in, then that's the best solution.
Find nearby slab and foundation contractors to help with your footings.
You can place concrete in up to 1 inch of water-concrete is 2½ times heavier than water, and it will displace the water. You might want to thicken the footings in that case, because the bottom of the concrete may absorb some water and be a little weaker than normal.
But if the soil is loose and porous, and water and soil keep coming back into the trench as you pump the water out, use large aggregate to build up the trench. For this, large stone or cobbles 2-inch- or 3-inch-diameter rock are best.
When you form the footings, place enough large stone into the wet, mucky zone to get up above the water table. Compact the stone down into the mud, then pour your footing. The large aggregate allows the muck to fill into the pore space, but as long as all the pieces of stone are in contact with each other, the stone can still transfer the load.
Shop for concrete forming products from leading manufacturers.
If the stone is piled so high in the forms that your footing becomes too thin (less than 4 inches thick), place transverse rebar to reinforce it, as shown (be sure that the footings are thick enough to cover the steel by at least 3 inches).
Fixes for Misplaced Footing
It's hard sometimes to position footings in the trench, so contractors often see walls that are not in the center of the footing. The foundation wall has to be located correctly to support the house, of course, so it has been placed off-center on the footing.
In good bearing soil, I wouldn't get too concerned about this foundation for the loads involved in a simple wood frame house. The full width of the footing isn't needed to support the loads anyway; you could pour the wall right on the edge of the footing and still have enough support. However, if you start to go over the edge and have the wall sticking out past the footing on the side or on the end, then you're starting to apply a rotational force that the footing is not designed to handle. In that case, you should think about getting an engineer involved. (If your soils are relatively soft, the risk is even greater.)
As an engineer, I've been asked to recommend solutions in cases where the footing has been placed so that the wall, when cast, would actually extend beyond it. My suggestions are different in strong soils than in average orbelow-average soils. In soils with bearing capacity greater than about 4,000 psf, I suggest excavating next to thefooting and under it, and placing compacted large gravel into the space. That should be adequate to support thewall. If there's a keyway in the wall, fill it in, and if there's steel projecting from the footing, cut it off. Drill holes and epoxy steel into the footing to tie the wall to the footing, and then form and cast the wall.

This incorrectly placed footing caused the foundation wall to be off-center. If the soil is very strong, this may not lead to problems. If the footing is on a weaker soil however, the author will recommend that it be fixed.
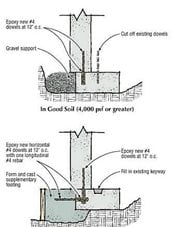
In strong soils, a mistake in footing layout can be corrected by placing gravel to support the wall (side). In weaker soils, the author recommends casting an augmented footing alongside the existing footing (side), connected bydowels epoxied into the side of the existing footing. Be sure to fill any notches in the footing, and cut off anyexisting steel dowels that will miss the wall.
In weaker soils, you have to augment the footing itself with steel and concrete. Excavate as before, but instead of using gravel, drill into the side of the footing and epoxy steel dowels into it, then place concrete to extend the footing out to the proper width.
Spanning Over a Soft Spot

If a form stake sinks in too easily, the soil may be too soft. For localized soft spots, the author recommendswidening the footing. In wet, mucky areas, he recommends compacting large cobbles into the mud to providebearing
Some sites have occasional soft spots in otherwise good soil. You usually discover such spots when you're driving stakes for the footing forms you hit a stake and it just about disappears with one blow. Maybe there's a layer of soft clay that rises from an old lake bottom at an angle and just intersects your trench in one or two places. If a stake sinks in easily under hand pressure, there's cause for concern.
Related: Bearing Capacity of Soil
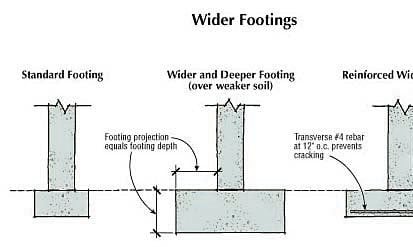
When a footing must be widened to boost bearing ability, it should also be reinforced or deepened. An unreinforced footing that is too wide may crack close to the wall, overloading the soil beneath. Without reinforcement, codes say the thickness of the footing should be at least as great as the distance it projects next to the wall. As an alternative, the author recommends transverse (crosswise) #4 bar at 12 inches o.c.
You may have to excavate down past the soft spot and place a deeper footing, then pour a taller wall. Or you may have to pier down through the soft material to get a bearing on good material. Another option is to excavate out the soft soil and replace it with compacted gravel or low-strength concrete, also called lean fill.
But in many cases, widening the footing is the simplest solution. If you've got a 16-inch footing, increasing that to 32 inches doubles your bearing area, making the footing suitable for soil with half the capacity.
Related: Footing Dimensions
If you increase the footing width, the code requires an increased thickness as well. That's because a footing that's too wide and not thick enough will experience a bending force that could crack the concrete. The projection of the footing on either side of the wall is supposed to be no greater than the depth of the footing. So, for example, a 32-inch-wide footing under an 8-inch wall would need to be at least 12 inches thick. Instead, however, you could rein-force the footing with transverse steel (running in the crosswise direction, not along the footing). In most residential situations, #4 rod at 12 inches o.c. will be plenty for 8-inch-thick footings up to 4 feet wide. The steel should be placed about 3 inches up from the bottom of the footing.
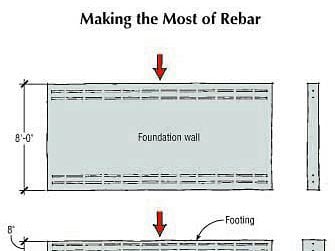
Even though a lot of contractors do it, one thing that will not help you span a soft spot in the soil is to add more steel along the long dimension of the footing. Throwing more longitudinal steel into a footing in this situation is just a waste of time and money. If you're going to add lengthwise steel, put it where it will do some good: in the wall, not the footing. Just as a 2x12 on edge is much stronger than a 2x4 on the flat, steel at the top and bottom of an 8-foot or 9-foot wall does much more work than steel placed into a skinny little footing. A wall with two #4 bars at the top and two at the bottom can span over a small soft area with no problem.
Steel in the wall has a greater effect than steel placed in the footing. In the wall, steel bars are almost 8 feetapart, while in a footing, the bars are only a few inches apart; the greater the spacing, the better the effect.
Jump Footings - Changes in Concrete Footing Elevations
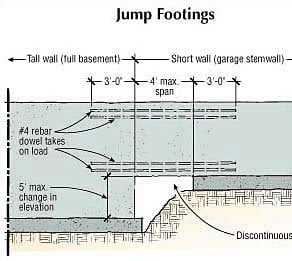
It's pretty common for a short wall to tie into a tall wall, especially in the North, where most houses have full basements but garages just have short frost walls. The code calls for continuous footings at all points. But that part of the code dates from the days when foundations were made mostly with concrete block, not poured concrete. Masonry foundation walls have no real spanning capability, so they have to be stepped down when elevations change. Concrete walls, on the other hand, can be reinforced with steel to span openings. That means the footings can be discontinuous, jumping from the 4-foot to the 8-foot or 9-foot elevation. The shorter wall can span the distance.
The concrete has to be appropriately reinforced. A typical house situation, where a 4-foot garage frost wall has to span 4 feet or less and tie into the main foundation, calls for two #4 bars at the top of the wall and two #4 bars at the bottom. The steel has to extend 3 feet into the main wall and 3 feet into the shorter wall beyond the point where the footing starts.
Discontinuous footings work fine for concrete walls, which can be reinforced to take the loads. A typical situation where a garage stem wall abuts a main basement wall can be handled by reinforcing the short section of wall that spans the opening with two #4 bars at the top and bottom, extending 3 feet into each adjoining section of wall above the footing. This solution is limited to a 4-foot maximum span and a 5-foot maximum change in elevation. If the walls are at right angles, the rebar has to be bent accordingly.
For this detail, the footings are formed and cast as usual. When you form the walls, the bottom of the forms must be capped with a piece of wood where the forms pass over empty space. In termite country, that wood must be stripped when the forms come off.
