- Concrete Pool Deck Info
- Pool Deck Pictures
- Pool Deck Design Ideas
- Stamped Concrete and Other Popular Pool Deck Surfaces
- Stamped Concrete
- Colored Concrete
- Exposed Aggregate
- Modern Concrete Pool Decks
- More Pool Deck Surfaces
- Compare Concrete Pool Decks
- Installing and Maintaining Concrete Pool Decks
- Pool Deck Cost
- Pool Coping
- Pool Deck Sealer
- Pool Deck Repair
- Pool Deck Resurfacing & Coatings
- Pool Deck Cleaning
- Other Resources
- Concrete Contractors: Find Concrete Products and Suppliers
- Design Ideas: Pool Deck Info
Listen Up! Good Listening Leads to a Successful Pool Deck Revamp
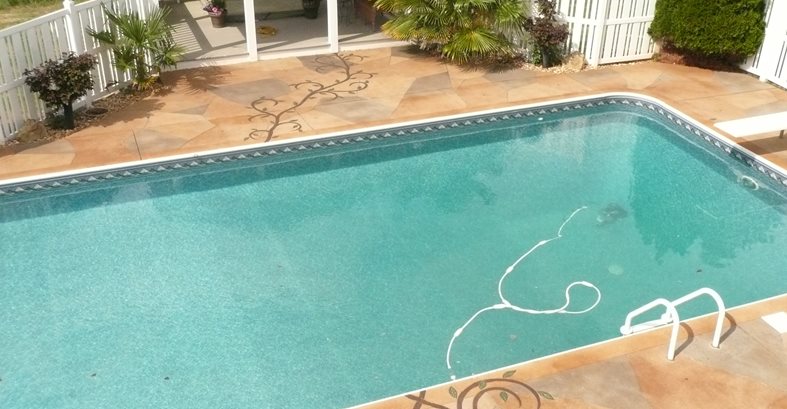
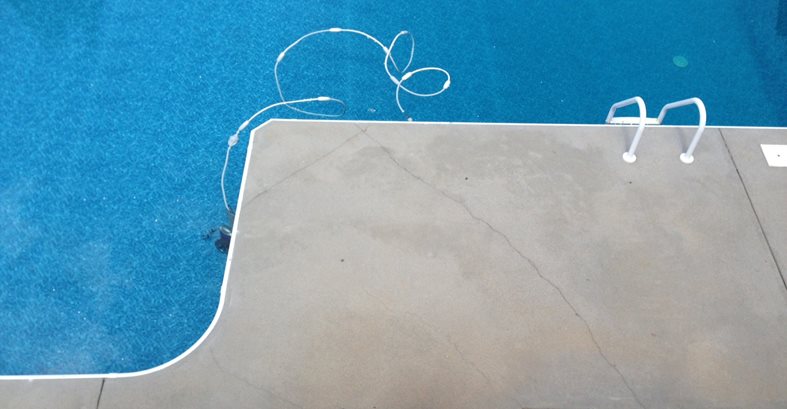
How a cracked pool deck was transformed with a flagstone pattern and vine designSometimes keeping quiet and listening to your customer’s needs can make the difference between landing a project or not. I must admit, in the past I was guilty of trying to oversell a technique or concept thinking that this was the perfect opportunity to try a new design when in reality, the client was thinking of something completely opposite. Becoming a good listener takes patience and practice. Usually, by asking a few simple questions, you can get a homeowner to describe a particular look or idea.
Recently, our company was contacted by a couple who had seen a project we’d done at their friends’ house and wanted to visit our shop to review conceptual ideas for their own project. Our business, the Decorative Concrete Institute, has a showroom consisting of almost one acre of architectural concrete displaying a wide variety of colors, patterns and textures which can be helpful in the selection process. However, with so many choices, it can easily overwhelm clients especially if they are not familiar with the different options.
After walking the property several times, they really liked the colors and texture of a flagstone patterned stamp. I explained that this was 6” thick stamped concrete and since their concrete deck was pre - existing, it would require a ½” thick overlay to obtain this look. Of course their first question was, “Is that expensive?” The prep work alone for this type of pattern would have required a tremendous amount of labor considering the concrete would have needed to be ground down at the pools coping edge to produce a seamless transition. What’s more, there was fairly extensive cracking that would need to be addressed. The material cost alone would have been upwards of $4.00 per square foot at that thickness combined with the multiple stain colors and sealer coats.
During our tour, I had my note pad and would scribble down their comments which really helped when the question was asked, “What other alternatives are there?” Since resurfacing was not an option due to budget constraints, several concepts were proposed of which the least expensive was to simply acid stain the deck with one color. They mentioned the desire for really trying to spruce up their deck with a little more pizazz especially since they were hosting their daughter’s high school graduation party in three weeks. What we ultimately came up with was to saw cut a flagstone pattern into the deck that somewhat mimicked the original pattern they liked. We were also able to use the identical acid stain colors used on the sample. “What about the cracks?” Joey the husband asked. I mentioned that rather than try to hide or mask the cracks, let’s draw attention to them and incorporate a design using the imperfections to our advantage. This would take the focus away from the flaws and make them a feature or highlight of the pool deck. Eureka! There we had it, a concept the clients loved.
Two days later after we had obtained a signed contract, it was time to get down to business. During our site visit, an observation was made that the two beautiful 15 foot tall pine juniper shrubs that had been planted roughly 16 years prior would need to be pruned since they were covering almost two feet of the concrete deck. Joey took the liberty to trim them himself and I can only thank the good Lord above that we did not self-perform the trimming. Needless to say, he pretty much hacked them up which really upset his wife. As a result, it was my understanding that he was in the dog house for several days. For you decorative concrete contractors, this scenario can be used as a good lesson since most of you are not horticulturalists or landscapers, this consideration needs to be clearly defined so your company cannot be held accountable for subpar trimming.
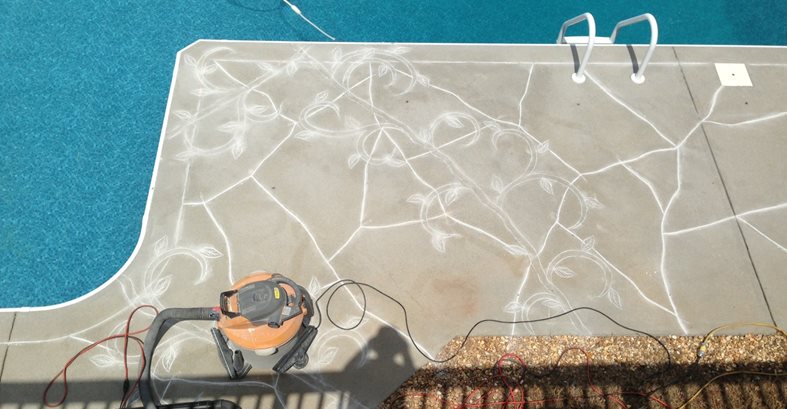
Now that their arguing had commenced regarding the shrubs, we started out by randomly laying out a flagstone pattern using soapstone taped to a stick. Once complete, a vine pattern with leaves was drawn on to the surface along the cracked sections as to appear that the vines were lying on top of the flagstone pattern. In addition, there were several cracks on a few small retaining walls that we also carried the pattern onto. All of the designs were free hand saw cut using a 4” angle grinder with two different types of diamond blades. The flagstone pattern was cut using a crack chaser V blade to make the joints wider while the vine pattern and leaves were cut using a standard 1/8” wide blade. It was important that the dust was captured with a shop vac considering we were working right up to the pool’s edge. My wife Lee Ann did an awesome job chasing me around the deck all day with the shop vac.
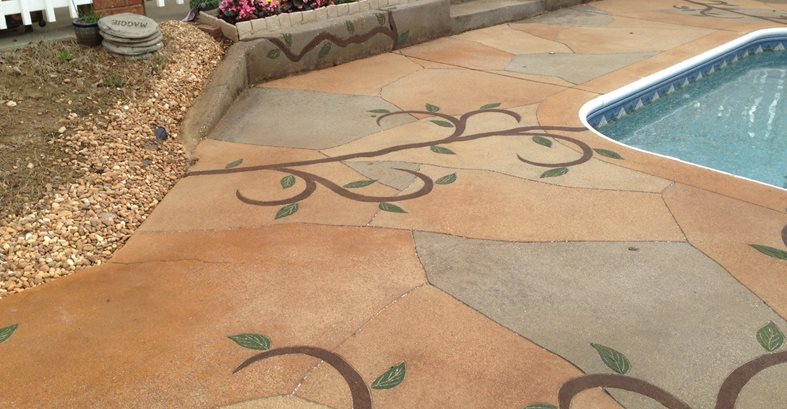
After the saw cutting was complete, an aggressive pressure wash was used to clean the deck in preparation for the applications of the acid stain colors. The first color was a spray applied black acid stain (diluted 8:1) as our base. Once the first coat was dry, four other colors of acid stain were hand brushed on to random stones leaving roughly 10% of the stones the original base color. Aggressive cleaning and neutralizing was the last step before moving on to coloring the vines and leaves with water based acrylic stains. This type of product was chosen because we wanted the bolder colors to accentuate the pattern making the cracks a main focal point of the pool deck as opposed to viewing them as a flaw.
After letting everything dry until the next day, two coats of thinned down solvent based acrylic was applied using a pump sprayer. Roughly two hours after the application of the second coat, a third and final coat of non-diluted sealer was rolled onto the deck using a 3/8” nap lint free roller cover. This coat had a non-skid resin sand additive mixed in at a ratio of 4 ounces by volume per gallon of sealer which provided a subtle textured surface but yet was not too aggressive to walk across with bare feet.
Once complete, our clients mentioned they were ecstatic with their new deck and how this work completely transformed their outdoor living space into something they were very proud of. They even re-landscaped certain areas of the backyard and purchased new patio furniture to complement the new deck. Rumor has it that the graduation party was a big success!
Remember, listen to what your clients’ needs are. You want them to have enough information necessary to make an informed decision, yet you do not want to overwhelm them with a thousand different options of what you think they want. Nine times out of ten simply listening to their needs will be enough for you to propose a couple of conceptual ideas.
Submit Your Own Project Photos
Read More About Concrete Pool Decks
Return to Concrete Pool Deck Projects
Read more articles by Bob Harris


