Heated Driveway Snow-Melting Systems
Learn about heated driveways and how electric and hydronic heating systems can eliminate ice buildup and the need for harmful deicing chemicalsConcrete driveways offer many advantages over asphalt, including greater durability, longer service life, and less maintenance. But in the winter, when temperatures plummet and the snow flies, concrete and asphalt surfaces have equal maintenance needs: Both require frequent shoveling and de-icing. Or do they?
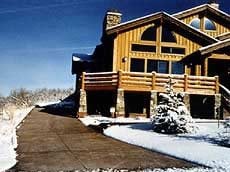
Some homeowners and businesses are keeping their exterior concrete surfaces maintenance-free and safe year-round by installing heated driveways with ice and snow-melting systems. Not only do these in-slab snow-melting systems eliminate plowing, backbreaking shoveling, and icy spills, they prevent potential damage to the concrete caused by snow-removal equipment and corrosive de-icers.
Though contractors usually install these systems in new slabs before placing the concrete, the heating elements can also be retrofitted into existing slabs.
Find driveway contractors near me.
BENEFITS OF DRIVEWAY HEATING SYSTEMS
Snow-melting systems are popular for both commercial and residential use. Here are some common applications:
- As a convenience. Owners of high-end homes install the systems in all their exterior slabs--including driveways, sidewalks, steps, and patios--to completely eliminate the need for shoveling.
- To target trouble spots. Homeowners who can't afford to install the systems in all their exterior concrete slabs use them only where snow and ice accumulation poses a problem. This may include in the wheel tracks of a driveway, in the front walkway and steps, or in driveways with steep inclines.
- To reduce snow removal costs and liability. Business owners use the systems in outdoor malls, parking lots, car washes, walkways, and loading ramps to eliminate the expense of snowplowing and to prevent slip-and-fall accidents.
Related: How to Melt Ice Without Damaging Concrete
THE FOUR KEY COMPONENTS OF SNOW-MELTING SYSTEMS
Generally, two types of snow-melting systems are available for use in exterior slabs on grade: hydronic and electric. Both rely on four key components to turn the entire slab surface into a radiant heat source.
- A heating element, which is embedded in the slab.
- Sensors to detect outdoor air temperatures and moisture.
- A power source.
- A controller to tie the heating element, sensors, and power source together.
HYDRONIC SNOW-MELTING SYSTEMS
The heating element in a hydronic system is a closed-loop tubing made of a flexible polymer (typically a cross-linked polyethylene) or a synthetic rubber that circulates a mixture of hot water and propylene glycol (antifreeze),much like the mixture used in a car radiator. The fluid is warmed to temperatures of 140 to 180 F to provide sufficient heat for snow melting.
The tubing ranges in diameter from 1/2 to 3/4 inch and is flexible enough to bend into various layout patterns. It's also designed to have a long service life. The tubing resists chemicals and corrosion and does not become soft at high operating temperatures or brittle at low outdoor temperatures. "We offer a 25-year warranty on the performance of our product," says Bill Bailey of Lee Hydronics, an installer of hydronic tubing.
Hydronic Power Requirements
The heat source — typically a water heater or boiler — can be powered by any energy source that satisfies the systems Btu requirements, including natural gas, electricity, oil, wood, or even solar collectors. For residential and light commercial snow melting, Bailey recommends providing about 100 to 150 Btu per square foot of slab surface. A circulating pump and supply-and-return manifolds installed in an easily accessible location transfer the water between the heat source and tubing.
Elements of A Successful Operation of Hydronic Heating Systems
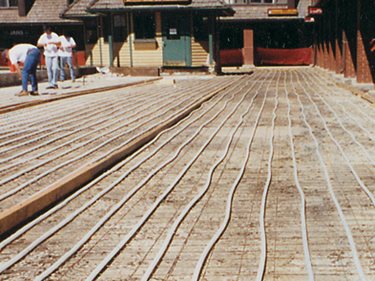
Successful operation of a hydronic heating system depends on proper tube spacing and layout. Because the hot water gives off heat as it travels through the slab, manufacturers usually recommend laying the tubes in a spiral or serpentine pattern to help distribute the heat evenly. Tube spacing depends on several factors including the snow-melting rate desired, the amount of insulation used under the slab, and the anticipated rate of heat loss. A typical spacing for an exterior slab on grade is 6 inches on center, which conveniently corresponds with the 6-inch grid pattern of welded wire reinforcing, but closer spacings may be needed in some applications.
ELECTRIC SNOW-MELTING SYSTEMS
Instead of hot water, electric systems use hot wires to heat pavement surfaces. The wires are surrounded by layers of insulation, copper grounding braid, and a protective outer jacket of PVC or polyolefin to form a flexible cable about 1/8 to 1/4 inch in diameter. The cable can be cut to length or spliced on the jobsite to suit various layouts.
To simplify installation, presized mats with the cables already embedded in them also are available. Some manufacturers can customize the mats for specific applications.
Electric Power Requirements
To melt snow efficiently, the cable should deliver about 36 to 50 watts of heating power per square foot of slab surface. Depending on the dimensions of the area to be heated, homeowners may need to upgrade their circuit panel or install a separate circuit to supply enough power.
"To heat a 1,000-square-foot driveway at 36 watts per square foot, 156 amps of electricity (36,000 watts divided by 230 volts) would be required," says Rodney Blackburn of Warm Floor Center, an installer of electric heating cables, primarily for the residential market. "To reduce operating costs, some homeowners just install the cables in the tire tracks of a driveway," he adds.
Warm Floor typically spaces the cables 3 to 5 inches on center, which will melt 2 to 4 inches of snow per hour, says Blackburn. For uniform heating, the cables should be arranged in a serpentine pattern running across the shortest dimension of the slab. Though the electric cable is buried in the concrete, both ends of the cable terminate in an above-ground weatherproof junction box for easy access.
HYDRONIC vs ELECTRIC: SNOW-MELTING SYSTEM COMPARISON TABLE
| Hydronic | Electric | |
|---|---|---|
| Advantages | Greater flexibility in power source options, which could result in lower operating costs. | Less warm-up time is required so system response is faster. |
| Disadvantages | Installation costs may be higher, especially if a separate water heater or boiler must be installed. | Only electricity can be used to power the system, so operating costs may be higher. |
| More maintenance is required; propylene glycol fluid levels must be checked regularly. | May require installation of a separate electrical circuit. | |
| Response time is slower; system may require constant idling. |
WHAT TO CONSIDER WHEN CHOOSING A SNOW-MELTING SYSTEM
Contractors and their customers must consider many factors before choosing the type and size of snow-melting system that's best suited for a particular application. A system design that works well in one city may be inadequate in another.
"Not all snow-melting systems are created equal," says Larry Drake of the Radiant Professionals Alliance, an organization for radiant heating and cooling contractors, wholesalers, and manufacturers. He offers the following tips for making wise planning and selection decisions.
- Utility costs and availability:
The cost and availability of utilities vary widely nationwide. The owner should consider the cost of electricity versus other power options such as propane, oil, natural gas, and solar. "With an electric system, the only utility you can use is electricity," says Drake. "With an hydronic system, you can use whatever power source is available, be it natural gas, propane, solar, or even electric." - Space availability:
An electric system simply plugs into a junction box. For an hydronic system, the owner must have the space to accommodate the water heater or boiler, circulating pump, and manifold. - User expectations:
Does the owner expect the driveway or sidewalk to be free of snow at all times, or is gradual melting within a few hours after snowfall acceptable? The former will result in higher equipment, installation, and operating costs. - Run-off:
Have provisions been made for where the melted snow is going to drain? In some cases, a drainage system may need to be installed, especially if heavy snowfalls are expected. - Retrofitting:
If the snow-melting system is to be installed in an existing slab, it's easier to retrofit an electric cable because it has a smaller diameter. "You can groove the concrete and lay the cables in the grooves," says Drake. For hydronic tubing, more concrete removal is required. - Maintenance:
A hydronic system typically requires more maintenance. In addition to maintaining the boiler and pump, "you must inspect the propylene glycol fluid levels periodically, just like the antifreeze in a car," explains Drake.
HEATED DRIVEWAY COST
The costs to operate snow melting systems vary widely depending on the size of the area being treated, local utility costs, the average total hours of snowfall, and how fast the system user wants to melt the snow. Obviously, the larger the area being heated and the more snow there is, the higher the operating cost. Also, a system used in a colder climate may require a higher wattage (for electric) or more Btu (for hydronic) than a similar system used in a warmer climate.
Watts Heatway, a supplier of hydronic systems, says annual operating costs range from 12 to 25 cents per square foot. So on average, it would cost $120 to $250 each winter to melt snow off a 1,000-square-foot driveway.
Depending on local utility rates, electric systems may cost even more to operate. EasyHeat, a supplier of electric snow melting mats, says that the seasonal cost to heat a 1,000-square-foot slab at 50 kilowatts will run about $276 in areas of light snowfall (50 inches per year or less) and $692 in areas with average snowfall (50 to 100 inches). Those estimates are based on an average kilowatt cost per hour of 6.92¢.
Material and installation costs vary widely too. For Warm Floor Centers electric system, the materials alone run $4 to $6 per square foot, according to Blackburn. Lee Hydronics system runs about $5 to $10 per square foot installed. "The biggest variable is how far the embedded tubing is located from the power source," claims Bailey. The farther away the utilities are, the higher the installation and operating costs.
INSTALLING AND OPERATING SNOW-MELTING SYSTEMS
Most of the components of snow-melting systems, particularly the power source and controls, are installed by a plumbing (for hydronic), electrical, or HVAC contractor. But concrete contractors often become involved when it's time to embed the heating elements in the slab. The procedures are similar for both system types.
- Before the concrete pour, lay out the tubing or cable at the predetermined spacing.
- Secure it to the welded wire reinforcing mesh using nylon or plastic pull ties or clips that wont corrode.
- Use plastic chairs to support the wire mesh so the attached tubing or cable is about 2 inches below the finished slab surface.
- "A minimum concrete cover of 2 inches gives a good response time," says Bailey. If the heating element is embedded lower in the slab, it takes more time for the heat to reach the surface, which wastes energy.
At expansion joints, where slab movement could cause stress, it's necessary to take special precautions. "We run electrical cable from the first slab, form a 6-inch loop down into the sand trench under the expansion joint, and then run the cable up into the next slab. This allows for movement of the slabs without damage to the cable," explains Blackburn. Bailey recommends wrapping hydronic tubing with pipe insulation where it extends through expansion joints. "The tubing can take the linear stretch at expansion joints; the concern is shear movement," he says. "The insulation acts as a cushion if the slabs rise up or down."
Both electric and hydronic systems must be tested before and during concrete placement to ensure that no damage has been done to the heating elements during installation. For hydronic systems, the tubing is pressure-tested with compressed air or water according to the manufacturers recommendations. For electric systems, an Ohmmeter is attached to the cable to compare the reading to the factory value, which can be found on the cables UL tag.
System Sensors and Controls
Snow-melting systems can be controlled manually or automatically. Automatic controllers use sensors to trigger the heating element and to determine when it's time to shut off; the user doesn't have to be around to activate the controls. The sensors measure the air temperature and moisture content. When they detect the presence of moisture at near-freezing air temperatures, the system will kick on automatically and raise the concrete surface temperature to about 45 F. When the precipitation stops or the air temperature rises, the system will shut off. An override switch allows the user to control the system manually if necessary.
In a heavy snowfall, when snow accumulates at a faster rate, extra heating time may be required for complete removal. Sensors can be mounted in the pavement being heated, on a nearby post, or in any spot not sheltered from the weather, such as on a garage overhang or roof. More sophisticated systems can have multiple sensors that control different zones of pavement independently.
Some system owners, particularly businesses that don't operate round-the-clock, prefer manual controls that don't rely on sensors. These controllers generally are less expensive to install and can be turned on only when snow removal is required.
Once activated, hydronic systems usually have a slower response time than electric systems because the fluid that circulates through the tubing must first be heated. If fast response is critical, hydronic systems can be operated during the winter at a reduced idling rate to keep fluid in the pipes warm enough to react quickly to impending snowfall.
The Importance of Insulation
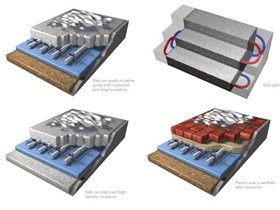
Adding insulation both under the slab and near its exposed edges reduces heat loss into the ground and allows the slab to heat more quickly, which lowers total operating costs. "We always insulate the substrate because it helps the system heat more efficiently," says Blackburn. "If we don't, the user has to operate the system at a higher wattage per square foot."
Many manufacturers recommend insulating the slab with rigid polystyrene foam 1 to 2 inches thick. But both Blackburn and Bailey prefer to use reflective insulation consisting of a layer of aluminum foil sandwiched between two layers of polyethylene bubbles. Bailey uses a product by Covertech Fabricating that's only about 5/16-inch thick and also serves as a vapor barrier. "The thickness of foam board can be a problem in a slab that's only 4 to 5 inches thick," says Bailey. Also, if the foam isn't placed on a perfectly level sub-grade, it can crack, reducing its insulation value. Supplied in rolls, the reflective insulation is also easier for workers to carry and install.
Making Repairs to Snow-Melting Systems
Though hydronic tubing and electric cable are protected by tough outer jackets, they aren't impervious to damage, especially during installation. Most damage is fixable, and that's why manufacturers recommend testing their systems both before and during concrete placement. At that stage, it's fairly easy for contractors to make repairs in the field using kits supplied by the manufacturer.
Once the heating elements are embedded, repairs are more difficult because concrete around the damaged section must be removed first. Detecting the trouble spot also is trickier. A rupture in hydronic tubing can be detected by an infrared scan gun that senses heat, says Bailey. To detect a breach in electric cable, Blackburn uses an electronic detection system that can tell how many lineal feet down the cable a break is located.
To avoid damage to tubes or cables during concrete placement, contractors should never drive ready-mix trucks over them. Instead, they should use pumps or wheelbarrows to place the concrete.
RESOURCES FOR CONTRACTORS TO LEARN MORE ABOUT SNOW-MELTING SYSTEMS
In order for these systems to run efficiently and provide their full benefits, they must be installed properly.
Contractors who want to learn more about these systems and the installation process can get help from the following sources:
- See a Michigan project where an electric ice melt system was installed beneath driveway pavers.
- System suppliers often can provide detailed design guidelines and free computer-aided design services to help contractors lay out and install the tubes properly.
- The Radiant Professionals Alliance offers homeowner tips for the design and installation of residential radiant heating systems.
- The HVAC Applications Handbook, published by ASHRAE, contains a chapter on both hydronic and electric snow-melting systems. Topics include heating requirements, system design, pavement design, and controls. The chapter can be purchased at the ASHRAE Web site for $52.


