- Countertop Supplies Home
- Concrete Countertop Molds
- Concrete Countertop Mix
- Pigments & Custom Options: Color additives, special effects & decorative add-ins
- Countertop Reinforcement
- Casting Equipment: Tables, mixers, vibrators & curing covers
- Countertop Finishing & Installation
- How to Polish Concrete Countertops
- Sealers for Concrete Countertops
- Delivery and Installation
- Related Reading
- Problems with Concrete Countertops
- Countertop Product Reviews
- Concrete Countertop Basics: Pricing, colors, edge details, and more
How to Polish Concrete Countertops
A step-by-step overview of the polishing process for concrete countertopsIt’s often desirable to polish the surface and edges of a concrete countertop to create a smoother, more aesthetically pleasing finish. In addition to giving your countertops an attractive sheen and exposing some of the aggregate or decorative add-ins, polishing will also remove small blemishes and flaws resulting from the casting process.
Tools Required
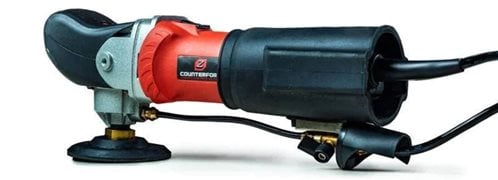
- A variable-speed (500 to 3,000 rpm) hand-held wet concrete polisher equipped with a built-in water feed and GFCI shutoff.
- A set of diamond grinding pads, with grit levels ranging from coarse to fine. Both Buddy Rhodes and Jeff Girard use diamond pads with grit numbers ranging from 50 to 3,000. The more aggressive, coarser grits work best at exposing aggregates and removing blemishes. Youll use the finer grits for final polishing, progressing to higher grit levels until you achieve the desired surface sheen and smoothness.
- A large squeegee.
- Safety goggles and ear plugs.
- Hand-held diamond blocks or pads for polishing areas of the countertop that can’t be reached by the electric polisher.
Get tools for polishing concrete countertops
Buying tips: A grinder/polisher with an attached water feed for wet grinding will help to reduce dust and extend the working life of the pads. Girard uses a grinder with an operating speed of 4,000 rpm. Since youll be switching pads frequently, also ask if the mounting system on the grinder permits fast changeovers.

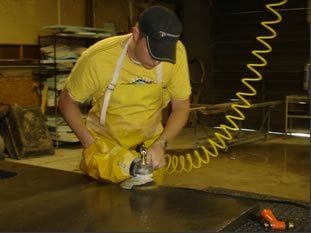
Using a small wet grinder. Countertop Institute in Raleigh, NC

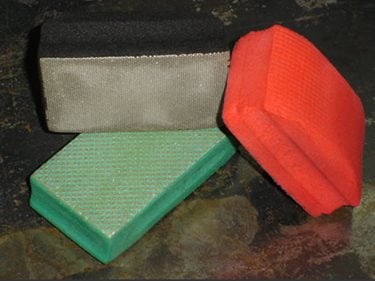
Hand finishing pads. Concrete Countertop Institute in Raleigh, NC
And don't neglect the obvious: Be sure to buy diamond pads suitable for use with your grinder and specifically designed for grinding concrete, not granite. Concrete has rough, hard aggregate in a relatively soft matrix. Granite is uniformly hard. If you use pads designed for granite, they will not last as long or work as effectively, says Girard.
Polishing Steps
Step 1: Clean the fully cured concrete countertop by running water over the surface and then going over it with a squeegee to remove any grit that could gouge the concrete as you grind it.
Step 2: If you notice minor flaws or tiny bugholes, be ready to fill these voids with a patching slurry prior to polishing. Slurries can be color-matched to the countertop or in a contrasting hue to create veining. You can mix up the slurry yourself using a combination of cement, fine sand, water, and pigment. But for greater convenience, consider buying a ready-to-use prepackaged slurry, which is often sold by the suppliers of countertop mixes. Be sure to get a product compatible with the mix you're using. Some are available in various pigments.
Step 3: Start by polishing with the coarsest pad (typically 50 grit), depending on the desired finish. Go over the entire surface, including the edges, making sure to supply a constant stream of water to the surface as you grind. Keep the polisher level as you go.
Step 4: After polishing the entire concrete countertop with a 50-grit pad, change to a 100-grit pad and polish the entire surface again. Repeat this process, working progressively through all the pads up to the finest 1500-grit pad. At this point, a sheen will begin to form. As you polish, periodically stop and squeegee the surface to remove any small bits of debris and check that you’ve exposed as much aggregate as desired. There are no hard-and-fast rules as to how long to polish with each pad. It depends on the hardness of the concrete and the results you want to achieve.
Step 5: Use hand-held diamond blocks or pads to polish any areas of the countertop that can’t be reached by the electric polisher. The pads can also used smooth the edges of the countertop. Like the pads for the electric polisher, hand-held pads have variations in grit going from 120 up to 1500.
Step 6: Allow the countertop to dry, and then apply a suitable food-safe concrete countertop sealer to prevent staining. (See Concrete Countertop Sealers.)
Tips for Achieving the Best Results
- Allow the concrete countertop to cure for a minimum of 10 days before polishing. Concrete younger than that is still too soft to polish well, and concrete older than a month will be more difficult to polish and will use up more pads.
- If you’re inexperienced at concrete countertop polishing, practice on some sample pieces or a mock-up before working on the finished countertop.
- To prevent swirl marks, hold the polisher as flat as possible on the surface and apply even pressure.
- When polishing along countertop edges, consider attaching a skirt to the polishing head to prevent material from spraying onto the ceiling.
- Do not polish the surface dry or fail to provide enough water to cool the polishing pads. Otherwise, they will wear out quickly.
- Be sure that when polishing with hand-held pads to match the sequence used with the electric polisher. For example, if polishing is done up to 1500 grit with the electric polisher, then make sure to hand polish in the same sequence up to 1500 grit.
Source: Fu-Tung Cheng, author of Concrete Countertops: Design, Forms, and Finishes for the New Kitchen and Bath, Concrete Countertops Made Simple
 Wet Polisher Bundle
Comes with diamond polishing pads.
 Casting Mats
Smooth, glass-like finish without polishing.
 Hand Polishing Pads
Diamond pads ranging from 60 to 300 grit.


